Thursday, November 11, 2010

Casting with Jennifer Stenhouse


I just finished taking an 8-week workshop on wax-carving and jewelry casting with Jennifer Stenhouse, and here's what I have to show for it. Not much in terms of sheer tonnage, maybe, but weighty proof of new skills and ways of thinking. After years of cautious wood carving, it was so liberating to work with a more back-and-forth material. If I carved too thin or snapped off a finger or flubbed a detail, I could just dribble on more wax and try again! Total revelation. Plus, unlike my one-of-a-kind wood pieces, each of these is reproducible.

Compared to the rest of the students, I worked at a glacial pace, but by my own standards, I was on fire. Here are some of the fruits of my labor...


A sterling version of the wooden "Generous" ring I carved earlier this year. The wood one needed to be considerably larger and thicker for strength, and I found it hard to break out of that mindset. The sterling version is smaller, with a lower profile and hollow spaces on the underside, but a workout nonetheless. Before I cast any more copies, I'll have to work on digging out more of the excess weight.


Two tiny hands holding tiny books; too heavy for earrings--pendants, maybe?


Three tiny pelvises, for sculpture and jewelry projects.


Five tiny peaches, each about the size of a pea, also made with both sculpture and jewelry in mind.

Even though there's still a lot of cleaning up to do on all these pieces, I feel like a kid with a bunch of new toys!

Monday, October 18, 2010

Wood Jewelry Workshop Review


Another year, another bumper crop of new wood jewelers. The students in my second annual "Jewelry that Grows on Trees" weekend workshop at Pratt were an ambitious and hard-working bunch. These are some of the pieces they produced in just two days.


Saturday, October 9, 2010

Coldworking Class with Rebecca Chernow


Intro to Coldworking
Pratt Fine Arts Center

As I described in my previous post about Pilchuck, a lot of glass work takes place far from the heat and glamor of the furnace. In a "cold shop" you can cut, grind, or polish glass using tools that stay cool under a continuous stream or spray of water. Coldworking has the potential to make--or break--a work of glass art.

I spent last weekend standing in a puddle and wiping indoor rain off my glasses while learning the ins and outs of Pratt's cold shop from the excellent Rebecca Chernow. The class is a pre-requisite for being able to rent the shop as an independent user, so there were a certain number of hoops to jump through, but Rebecca kept things moving and made sure we had some time to work on personal projects. She furnished each of us with the raw materials for three projects: a square of window glass for a sandblasted coaster (below; and yes, I did blast straight through the middle by accident), a bubble to cut into a candy dish, and a solid blob that became a lens-topped paperweight (above).

Friday, October 8, 2010

Upcoming Class: Intro to Kitchen Table Jewelry


Intro to Kitchen Table Jewelry
4 Wednesdays, October 13 - November 3, 2010
6pm – 9pm
University of Washington main campus
ASUW Experimental College

Two big things happened as soon as I earned my MFA: I started trying to make money from my jewelry, and I stopped having easy access to a studio. Yikes!

Luckily, by that time I had a long history of making jewelry whatever tools, materials, and space I could scrounge up. Now I'm sharing the strategies I've developed over the years in my new class for the University of Washington's ASUW Experimental College.

In contrast to the classes I normally teach in fantastically well-equipped studios (Pratt, Penland, the 92nd St Y, etc), I'll be focusing specifically on techniques that students can practice in the comfort of their own homes. We'll use tools that are affordable, safe, quiet, and won't require you to reinforce the floor or build an addition. We'll share some equipment and materials, and students will bring their own starter kit of personal tools (starts around $25).


This class is for you if:

-you're jewelry-curious but reluctant to splash out too much cash on a brand-new hobby.

-with the holidays looming, you'd like to make jewelry to wear or give to friends.
-you already make jewelry but would like to lighten your studio schedule.
-you'd like to explore the common ground between jewelry and another craft you already practice.
-you want to keep making jewelry while traveling around the world(of course, the easiest solution to this quandary it to take me with you).


Feel free to contact me with any questions!

Sunday, September 12, 2010

Upcoming PONCHO Lecture


This week at Seattle's Pratt Fine Arts Center, the 2009-10 PONCHO Artists-in-Residence & Gregory M. Robinson Pathways Scholars will present slides and discuss how they've been affected by their scholarship year. The presenters are Adele Eustis, Crista Matteson, Arun Sharma, Pete Singleton, and myself. I've had the opportunity to get to know some of the others this year, and I can't wait to see what they've come up with!

The talk takes place on Thursday, September 16, from 6:30 to 8pm, at 1902 S Main St in Seattle.

The PONCHO/Pathways show is on view at the Pratt Gallery in the Tashiro Kaplan Building (306 S Washington St, Ste 102) through October 1. A piece from each artist is also on display in Pratt's main building.

Friday, September 10, 2010

Upcoming Fall into Art Class


Next week I'll be teaching a 4 hour class on textured metal as part of Pratt's beginner-friendly Fall into Art series. Students will leave this fun, fast-paced class with a striking one-of-a-kind bracelet.

Fall into Art: Textured Metal Bracelets
Wednesday 15 September 2010, 6-10pm
Pratt Fine Arts Center, Seattle WA

Tuesday, September 7, 2010

Figure Sculpting


Last month I took at 4-session figure sculpting class at Pratt with Jeanne Ferraro. Ferraro is a Seattle artist and teacher who works in media ranging from clay, iron, and hot glass to charcoal, pencil and pastel.

Although I've been doing figurative work for a while now, I learned a great deal! During the first session we agreed on a pose and set to work building stick figure armatures out of plumbing pipes and twisted wire; because the wire is so flexible, limbs can be repositioned even after they're covered in clay. Putting on the first layer of clay was hugely fun and involved spanking the lumps with a chunk of wood until they took on some degree of form.

Then, the hard part: aiming for accuracy. We spent the better part of three classes circling the model like sharks, squinting as we measured parts of her body against our developing forms, carving off bits here and adding blobs of new clay there.


And before any of us were quite ready, we were done. Four sessions is not a lot of time! Some of my classmates will continue to work on their sculptures, and a few might even take molds and copy their forms in more lasting materials like resin or bronze. Mine is gracefully disintegrating on the deck.

Thursday, July 29, 2010

Post-Pilchuck Review


Pilchuck Glass School
Session 3, 2010


Like any savvy institution with a limited marketing budget, Pilchuck Glass School wants to know how you first heard of its existence: was it from a professor? A magazine article? A magazine ad? One of the school's own mailings? I think every printed interaction I've with Pilchuck has included these questions, and while I'd love help out, I'm useless. I honestly can't remember a time when I didn't know about Pilchuck--or a time when I didn't want to go.

Since Pilchuck was founded slightly before I was, in 1972, it's possible that I heard the word very early on. Glass artist Dale Chihuly worked with art supporters Anne Gould Hauberg and John Hauberg to establish a dedicated glass school in the midst of a vast tree farm overlooking Puget Sound (below). Chihuly and his co-horts were dedicated to the notion of working in teams, a European model not then the norm in American glass schools and studios. This approach drastically expanded the scale and scope of the work they were able to achieve, and engendered strong relationships amongst Pilchuck glassworkers and visiting artists.


My course, "Glass with Passion", was lead by Dublin-based glass artist, Róisín de Buitléar. It was geared for novices and those with limited experience, but whereas most introductory glass classes would have beginners repeating the same simple forms, Róisín wanted us to jump right in to making objects that we could engage with. She asked each of us to come to Pilchuck with three items representing three personal passions; these would be the starting point for our glass work.


Above: My class bonding during a "hayride", enjoying Pilchuck's scenic grounds from the back of a mattress-lined truck.


We began with hot casting. By impressing or carving shapes into a mixture of clay and sand, you create a form that you can then fill with molten glass ladled out of the furnace. It's also possible to add extra elements such as leaves, wire, aluminum foil, or crushed glass frit, either to the void or to the surface of the hot glass. At the point when the glass is firm but still hot, you dig it out of the sand and hustle it over to a heated annealing oven, where it will be allowed to cool down slowly so that internal stresses don't cause the glass to crack.


Left: Our amazing teaching assistants making hot casting look easy.
Cathy Chase pours and Jono Lukas cuts the stream with shears when the mold is full.
Right:
Róisín's cast bundt cakes, still piping hot.

Next, we learned to create casting molds using pieces of steel fitted together like a puzzle. As with sand-casting, the hot glass is poured into the void; then the steel has to be agitated until it sets up so that they don't fuse together permanently.


Left: One of Sam's steel-cast pieces, just after the steel forms have been removed.

Right: My sand casting of a kashigata, after extensive grinding and polishing.

From casting, we moved on to blowing. While I initially assumed that we were progressing through the techniques in order of difficulty, it soon became apparent that another factor was in play. Casting is a team effort, at least for beginners. You need helpers to open the furnace door, to clean your dribbling ladle, to fix your hat (no joke!), and so on, but because the steps are much the same each time, the help is more or less automated, and if one helper does wander off you can yell for another or muddle through.

Blowing, on the other hand, is a much more nuanced dance. Each piece is different and progresses differently; while the person "in charge" can and does give commands, it's ideal if the assistant can anticipate them--at least to the degree of being on the right side of the bench for whatever is coming next. By the time we started blowing, my classmates and I knew each other well enough to develop this kind of communication.


Left: Jono advises as Annie attaches a punty to Erica's piece.

Right: Tamsin shapes her piece with wet newspaper as Tatiana gives it a little air.


The whole undertaking was very difficult for me. Strength, coordination, timing, unflappability, a high pain threshold, pithy communication--none of these qualities are nurtured by my everyday life or required by the kind of work I normally do.


So I decided to try for "simple", making bell jars to place over the small figures I've been carving lately. As I gained experience, they got larger, and thinner, and more regular. Then I gained just enough experience to get cocky and make a big mistake. I blew out a jar that was my largest and thinnest by far; putting it back into the glory hole to heat it for a final round of shaping, I let it get too hot and as I watched it collapsed in on itself. As I pulled it out, my teammates shook their heads: better to break it off and start again. But I reminded myself that I was there to learn, not to be perfect, so I blew it back out, shaped it it the best I could, and put it in the annealer.


That jar (above, far left) turned out to be one of my favorite pieces. It's a nice shape overall, but one wall is punctuated by an irregular scar, formed when the jar collapsed and the wall folded in on itself. It represents an all-too-rare moment when I allowed myself to act on the thought, "I wonder what would happen if...?"


I also started on a series of wood and glass doll forms, based on antique dolls that I saw in a museum several years ago. After one of our first days of glassblowing, I snuck off to the woodshop and turned a wooden doll--ostensibly so that I would have a model to work from, but really so I could feel in control for a little while. I made a few similar forms in solid glass, then got ambitious and did some hollow ones.


Many of my pieces still need to be "coldworked"--to have their sharp edges and rough surfaces ground down on wheels and sanders kept clean and cool by running water. In the meantime, I'm working out how to arrange them, and what to put inside them. Right now, they really are dolls, things that can occupy my hands while my mind plays.

Thank you to Pilchuck, to the staff and instructors, and to my comrades-in-arms! This experience will stick with me for a long time.


Glass is mighty hungry work! Check out my Sweet Travel blog to read about Pilchuck treats such as salmonberries, red huckleberries, and desserts by Holly.

In Brent McGregor's Workshop


Rocky Mountain Timber Products

When I was in Bend a couple of months ago I had the chance to visit Brent McGregor's workshop and showroom. McGregor is a master of what is often called "rustic" woodworking--and a very patient tour guide.


McGregor mostly works with juniper trees too twisted and irregular to be considered anything but waste by the timber industry. As a former logger himself, he has the skills needed to locate and extricate even the most isolated trees. After scouting and harvesting his materials, McGregor subjects them to a long process of stripping and finishing; his workshop (top and above) is filled with works in progress.


The showroom is stuffed to the rafters with sculpture, architectural elements, and furniture.


The outbuildings and grounds are a storage area for pieces of wood that I could happily stare at for hours--they're every bit as absorbing as those craggy stones in Zen dry gardens or on Chinese scholars' desks.

Monday, July 19, 2010

Noh Mask Carving Demonstration


One Saturday last month visitors to the Wing Luke Museum had the rare opportunity to see a live Noh performance by Nagoya's Chuuden Yuugakukai theater troupe. Noh is a type of traditional Japanese drama that features wooden masks. The intricately carved and lacquered masks transform male actors into stock characters ranging from heroes and maidens (above) to drunken sprites and vengeful crones.


Before the show, there was an even rarer opportunity to see how those masks are created. Since my entire MFA thesis work was based on Noh masks, I wasn't about to let the fact that I was scheduled to work that morning stand between me and seeing the real deal (thanks again for the shift switch, Roxanne!).

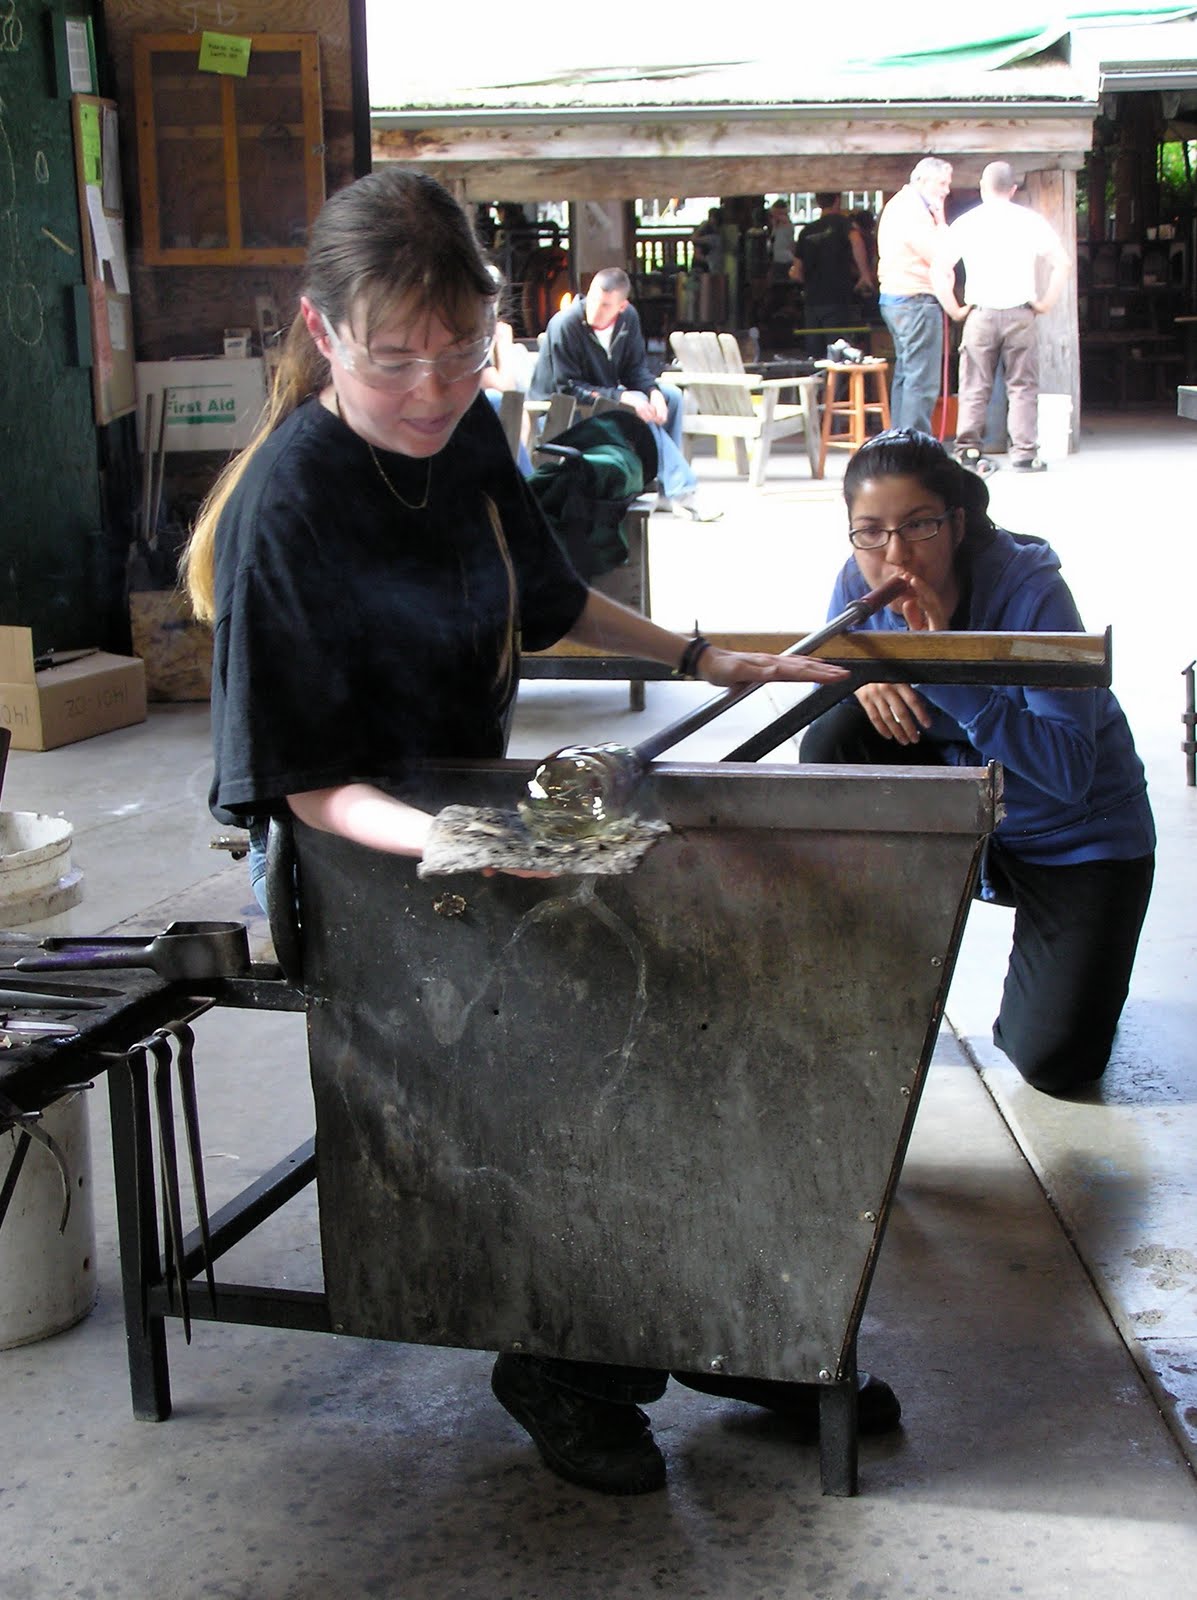
Two carvers set up shop in a small conference room for a brief demonstration of their tools and techniques. As they worked on rough but already recognizable masks, the carvers fielded questions from the crowd. As someone who got into carving relatively late in life, I was especially cheered to learn that before their second careers in Noh, both men were co-workers at an electric company.


Their masks-in-progress were the ones that most people would probably think of if challenged to imagine a Noh mask, idealized female features on a smooth, oval-shaped face. Although these faces appear simple (particularly when compared to some other masks that have horns or wrinkles or crazy expressions), their clean, refined symmetry makes them devilishly hard to carve.


In order to stick to an accepted standard, both carvers worked from photos of particularly prized masks. They used a variety of techniques to measure their progress against the model, frequently verifying their proportions with dividers and redrawing guidemarks in pencil as soon as the old ones were carved away. They also used cut paper templates to check the masks' profiles along several key cross-sections.


I was really struck by how frequently both carvers stopped to have a good look at how things were coming along. One of the most amazing things about this character's mask is that it should express different emotions depending on the tilt of the wearer's head, so the carvers made sure to check their work from various angles and in different lighting.


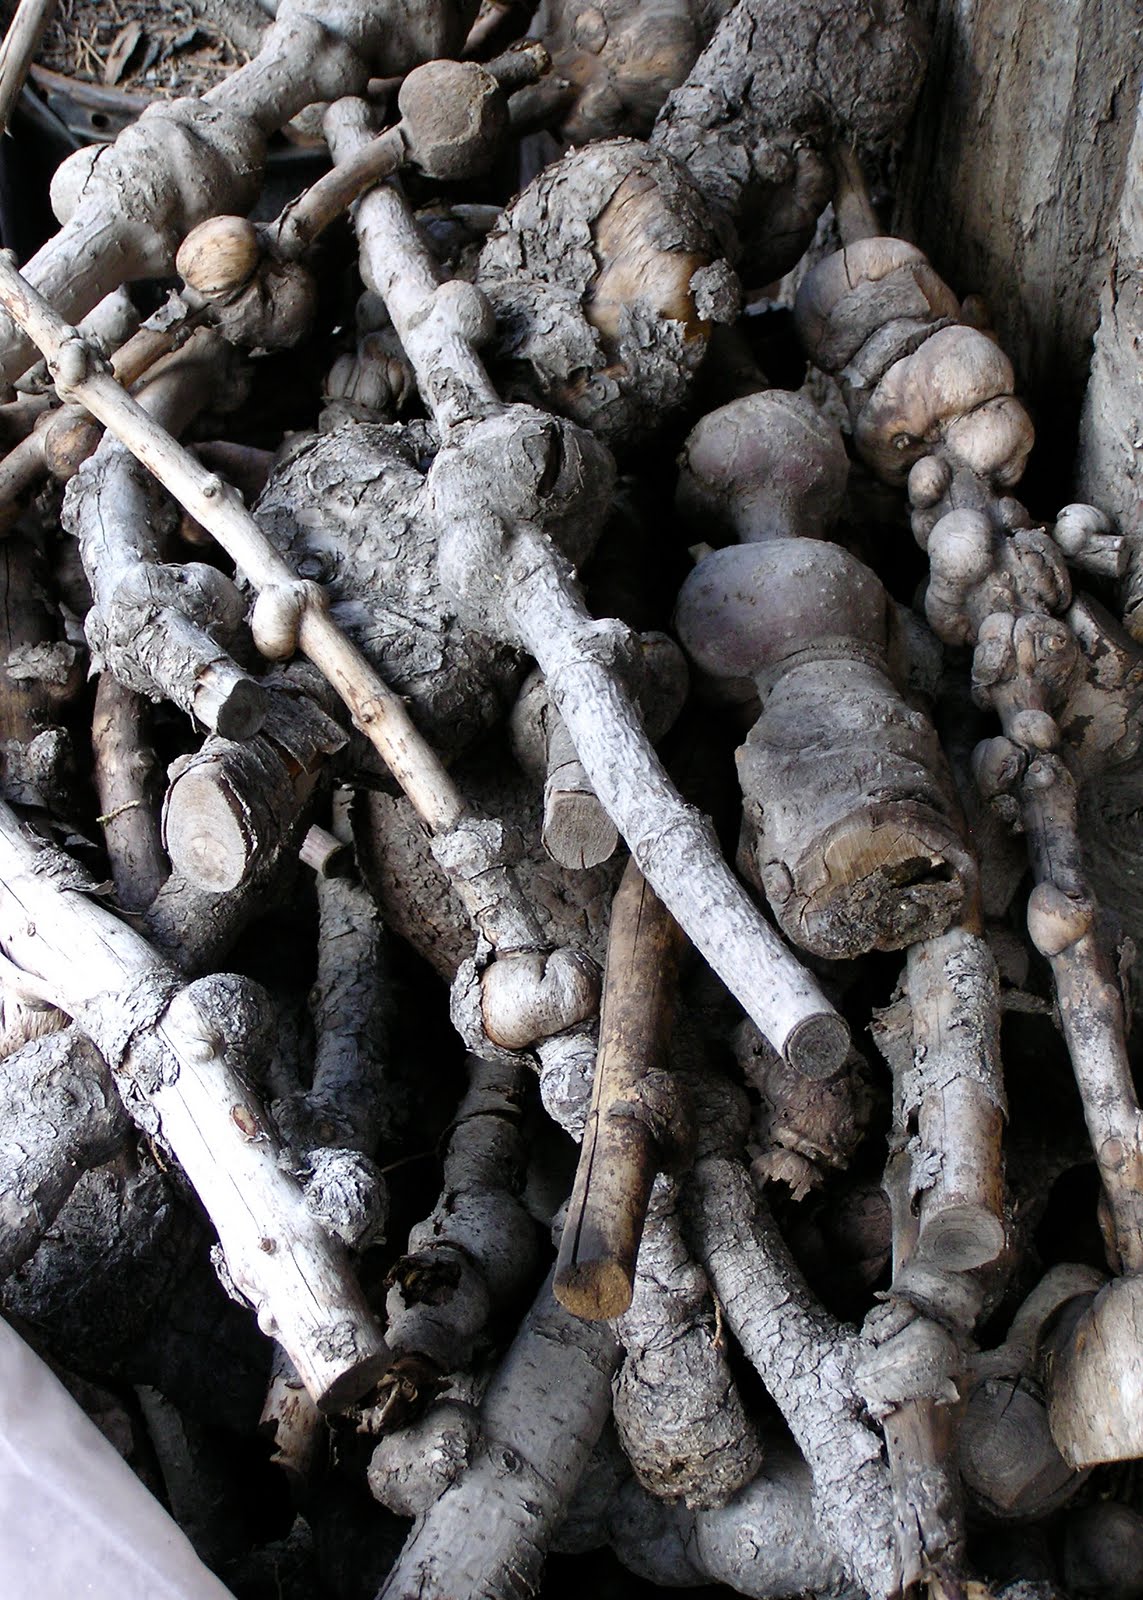
The hinoki (Japanese cypress) from which the masks are carved is close-grained but relatively soft, allowing the carvers to aggressively remove large amounts of material from the back and sides.


After the mask's interior and exterior are carved, another artist will apply coats of lacquer; above, the hair texture on a red-faced Shojo mask. We didn't get to see this step, but that's probably for the best since the materials are pretty toxic.


Although I've examined many Noh masks in pictures and in person, this demonstration thoroughly enriched my understanding and appreciation of the art form. The icing on the cake was the chance to experience a Noh mask from an actor's perspective (above). Although the mask was much lighter than I expected, the eyeholes were incredibly small and difficult to see through. I can only imagine the skill and training required to navigate a spotlit stage in a heavy kimono while blinkered by one of these beautiful masks!